So, You’re Thinking About a Home Remodel? Let’s Talk Reality (And Budgets)
Okay, let’s be real for a second. We’ve all been there, scrolling through flawless home renovation feeds, dreaming of that perfect kitchen or spa-like bathroom. The vision is crystal clear. Then, you start thinking about the actual process—the dust, the decisions, the mysterious “ballpark figure” that everyone seems allergic to defining. Suddenly, the dream feels a bit… daunting. We get it. We’re in the trenches every day, and we’re here to have that honest, no-BS chat about what it really takes to transform your San Jose area home.
Think of us as your friendly neighborhood guides through the wild world of general remodeling. We’re Lecut Construction, your local renovation contractor based right here in Silicon Valley, and we’ve seen it all. We want to walk you through the good, the messy, and the absolutely worth-it journey of a remodel, whether you’re in Santa Clara, Campbell, or Morgan Hill.
The Great Myth: Finding the “Right” Cost Online
First thing’s first: let’s tackle the elephant in the room. You’ve probably typed “bathroom remodeler near me” and “cost” into a search bar approximately fifty times. The results? A wild range of numbers that make about as much sense as a screen door on a submarine. Why is that?
Well, every home and every homeowner’s vision is unique. A bathroom remodel can mean anything from a simple fixture swap to a full gut job with moving plumbing lines. Online calculators can’t see the outdated wiring hiding behind your walls or the subfloor moisture issue you never knew about. Getting a true price requires a conversation and a professional eye. That’s where a detailed consultation with a general contractor like us comes in. We replace guesswork with clarity, which, IMO, is priceless.
Why “Abortable” is Your New Favorite Word
Here’s a bit of insider wisdom we live by at Lecut Construction: a good plan is an abortable plan. Sounds intense, right? What we mean is that at every major phase of your project—from design to demolition to installation—there should be a logical, clean stopping point if life throws you a curveball (and it often does).
We structure our projects so you’re not left with a gaping hole in your living room wall for six months if you need to pause. This approach reduces stress, protects your investment, and keeps the project manageable. It’s not about expecting failure; it’s about respecting your life and budget. Asking your potential house remodeling contractor about their phased approach is a pro-move you won’t regret.
The Lecut Blueprint: More Than Just Home Remodeling Services
So, what does working with a best remodeling company actually look like? It’s more than swinging hammers—it’s a partnership. Here’s a peek at our typical flow for a full home remodel or a major project like home additions:
Phase 1: The Discovery & Design Dance
This is where we get obsessed with your vision. We listen, we measure, we sketch. We talk about how you live in your Cupertino bungalow or your Los Gatos family home. This phase is all about aligning dreams with reality and, yes, budget. We provide clear, detailed proposals so you know exactly what you’re investing in. No nasty surprises.
Phase 2: The Pre-Game: Permits & Prep
The unglamorous but utterly critical phase. We handle the permit wrangling with local San Jose, Sunnyvale, or Saratoga authorities. Simultaneously, we finalize schedules, order materials (to avoid those pesky 16-week lead times), and set up the job site. Proper prep prevents 90% of on-site headaches.
Phase 3: Build It Right, Build It Once
Now the transformation begins. Our crews are meticulous, clean, and communicative. Whether it’s exterior remodeling to boost your curb appeal or crafting that dream kitchen, we focus on precision. We keep you in the loop daily and hold weekly check-ins. You should never feel like your project is a black box.
The Local Lowdown: Why Your Silicon Valley Neighborhood Matters
Working with a team that knows our local turf inside and out is a massive advantage. Building codes can have subtle variations between Milpitas and Fremont. We know the inspectors, we understand the soil in Morgan Hill, and we’ve navigated the design guidelines in historic Saratoga. This local expertise saves you time, money, and a whole lot of frustration.
A Quick Comparison: The DIY Dream vs. The Pro Path
Let’s break this down honestly.
- The Vision: You have a Pinterest board. We have architectural software and material samples to bring it to life in 3D.
- The Timeline: Your weekends for the next year. Our coordinated schedule of specialized trades.
- The Budget: Seemingly low upfront, but prone to cost overruns from mistakes and tool rentals. A fixed, detailed contract that defines the investment.
- The Stress Level: High. You’re project manager, laborer, and problem-solver. Managed. We handle the problems; you enjoy the progress.
- The Final Result: Hopefully good. Guaranteed professional and permitted.
Your Remodeling Roadmap: A Handy Table
Let’s get practical. Here’s a rough guide to common projects we’re asked about. Remember, these are starting points—your specific choices (materials, scope, home age) are what determine the final investment.
| Project Type | Typical Scope | Key Considerations | Why It’s Worth It |
|---|---|---|---|
| Kitchen Remodel | Cabinets, countertops, appliances, flooring, lighting. | The heart of the home. Layout changes (moving plumbing/electrical) increase cost but also functionality and value. | Massive ROI in daily joy and resale value. A well-done kitchen sells homes. |
| Bathroom Remodel | Vanity, tile, shower/tub, toilet, lighting, ventilation. | Waterproofing is non-negotiable. Small space, big impact. | Creates a personal sanctuary and addresses essential moisture issues. |
| Home Addition | Adding square footage (room, second story, ADU). | Foundation work, roofing tie-ins, and seamlessly matching the existing home’s style. | Ultimate solution for growing families without the hassle of moving. |
| Exterior Remodeling | New siding, windows, doors, roofing, paint. | Curb appeal and protection from the elements. Material durability is key. | First impressions matter. Improves energy efficiency and shields your biggest asset. |
Let’s Answer Those Burning Questions
You Asked, We’re Answering
We hear these all the time. Here’s our straight-shooting take.
1. How long will my remodel really take?
Longer than the HGTV episode, but we promise not to drag it out. A standard bathroom might be 3-5 weeks; a major full home remodel could be 4-6 months. The timeline depends on complexity, permits, and material availability. We give you a realistic schedule upfront and fight to keep it on track.
2. How do you handle dust and mess?
We’re not savages! We use heavy-duty zip-wall barriers, floor protection, and run HEPA air scrubbers. We contain the chaos to the work zone as much as humanly possible. Your living space stays livable.
3. Can I live in my home during the remodel?
In most cases, yes! For a kitchen remodel, we set up a temporary kitchenette. For a single bathroom, you use another. For massive projects, we’ll have an honest chat about what’s feasible. Our phased, abortable approach is designed to minimize disruption.
4. Why choose Lecut Construction over another general contractor?
Because we treat your home like it’s our own. We’re not a giant, impersonal franchise. We’re your neighbors in San Jose. We offer clear communication, meticulous craftsmanship, and a partnership you can trust. We don’t just build projects; we build relationships and stunning homes across Silicon Valley.
The Final Nail: Making the Dream a (Beautiful) Reality
Look, remodeling is a significant undertaking. But it’s also one of the most rewarding things you can do for your home and your family’s quality of life. It’s about creating a space that truly works for you.
The secret is choosing a partner who makes the process clear, collaborative, and even enjoyable. A team that shows up on time, cleans up, and answers your texts. That’s the standard we hold ourselves to every single day at Lecut Construction.
So, if you’re done with vague online estimates and ready for a real conversation about your home remodeling services project in San Jose or any of our wonderful surrounding cities, give us a shout. Let’s grab a coffee, look at your plans, and build something amazing together. Your dream home is waiting, and honestly, we can’t wait to help you unlock it 🙂
People Also Ask
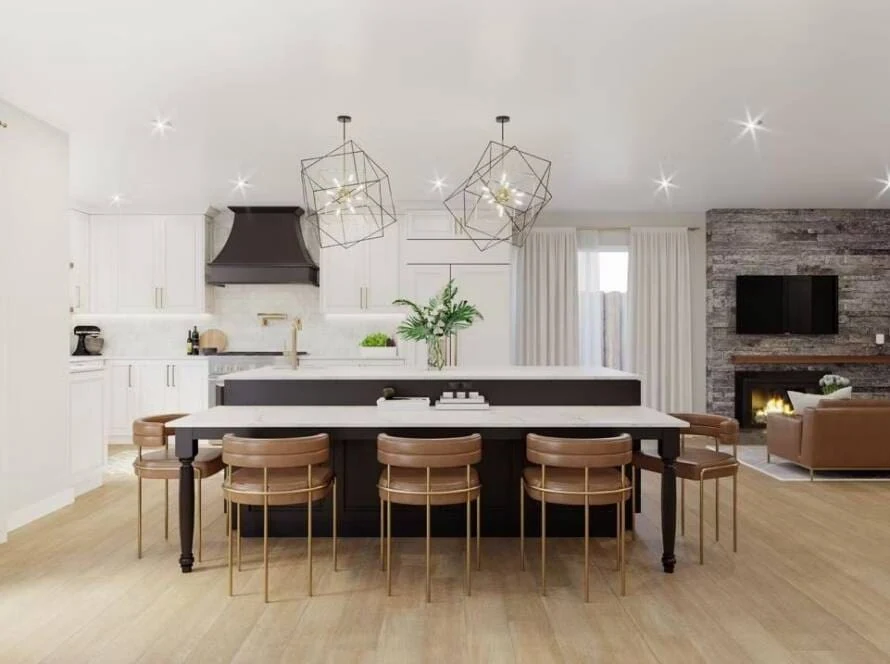
Island kitchen layout drawings are essential for planning a functional and aesthetically pleasing space. The island typically serves as a central hub for food prep, casual dining, and storage. Key considerations in the drawing include ensuring a minimum of 36 to 48 inches of clearance on all sides for safe traffic flow and appliance door clearance. The island's dimensions should be proportional to the overall kitchen size; a common guideline is that it should not occupy more than 10% of the total floor area. Electrical and plumbing plans for sinks or cooktops must be integrated. The layout should also detail cabinetry, overhang for seating, and material specifications, aligning with overall workflow between the sink, refrigerator, and primary cooking surface.
Looking for kitchen island inspiration? Start by considering your space and needs. A popular trend is the multi-level island, which separates prep and dining areas. For smaller kitchens, a portable butcher block island adds flexibility. Materials like quartz or marble offer durability and style. Incorporate seating with stylish bar stools to create a casual eating area. Smart storage solutions, such as deep drawers or open shelving, keep essentials handy. Lighting is key; pendant lights above the island enhance both function and ambiance. For a unique touch, consider a contrasting color or a waterfall edge countertop. Always ensure there’s adequate clearance—at least 36 inches—around the island for safe movement.
Incorporating a kitchen island into a small kitchen requires smart design to maximize function without overcrowding. Opt for a slim, mobile island on casters that can be moved as needed, providing extra prep space and storage that tucks away. A narrow, peninsula-style island attached to a wall or cabinetry saves floor space while offering seating and countertop area. Consider a waterfall countertop on a petite island to create a visual anchor. Multi-level designs with a lowered eating section can define zones. For storage, use open shelving instead of bulky cabinets. The key is selecting a light-colored, space-efficient design that serves multiple purposes—prep, dining, and storage—without obstructing the essential workflow in a compact kitchen.
When planning a kitchen island with seating, focus on both functionality and style. Ensure there is adequate clearance—at least 42 to 48 inches of walkway space around the island. For seating, allow 24 to 30 inches of width per person and consider a counter overhang of at least 12 inches for knee space. Popular ideas include a waterfall island with durable stone sides, a two-tier design separating prep and eating areas, or a portable butcher block island for flexibility. Incorporate practical elements like drawers for linens, electrical outlets for devices, and pendant lighting above. Choose comfortable, sturdy stools that complement your kitchen's aesthetic, whether it's industrial, farmhouse, or modern minimalist.
When designing a kitchen island, adhering to standard dimensions is crucial for both functionality and safety. A typical freestanding island should be at least 4 feet long and 2 feet deep. For seating, allow 24 to 30 inches of width per stool and ensure a clearance of at least 42 inches around all sides for traffic flow. The standard countertop height is 36 inches, but a raised bar section for seating is often 42 inches. The island's depth often matches base cabinets at 24 inches, but can be larger for more workspace. Always consider the work triangle and ensure appliances like dishwashers have proper clearance. Proper planning prevents a cramped kitchen and creates an efficient, social hub.
When designing a kitchen island with seating and storage, the key is to balance functionality and aesthetics. For seating, allow at least 24 inches of width per stool and ensure a 9 to 13-inch overhang. Incorporate deep drawers for pots, pull-out shelves for pantry items, and dedicated compartments for trash and recycling. A popular design is a two-tier island, with a raised bar for eating and a lower level for prep, maximizing utility. Choose durable materials like quartz for the countertop and consider open shelving on one end for display. Always ensure there is adequate clearance—at least 42 to 48 inches around the island—for safe and comfortable traffic flow.
Modern kitchen islands are central to contemporary home design, blending functionality with style. A popular idea is incorporating a waterfall countertop, where the material extends down the sides for a sleek, continuous look. For practicality, include deep drawers for pots and a built-in microwave or wine cooler. A contrasting color or material, like a wood base with a quartz top, adds visual interest. Consider extending one end to create a casual breakfast bar with stylish pendant lighting above. For open-plan living, a double-sided island can separate cooking and dining areas effectively. Always ensure there is adequate clearance—at least 42 inches of walkway space around the island for safe and comfortable movement.
When planning a kitchen island cabinet layout, prioritize functionality and workflow. A popular design is a galley-style island with deep drawers for pots and pans on the cooking side and base cabinets with pull-out shelves for small appliances on the opposite side. Incorporating a mix of open shelving for display and closed cabinetry for concealment creates visual balance. For a prep sink or cooktop, ensure the surrounding base cabinets are configured for plumbing or ventilation needs. A dedicated cabinet for trash and recycling with rollout bins is a highly functional addition. Always maintain a minimum of 36 to 48 inches of clearance around the island for safe traffic flow and adhere to local building codes.